-
Templates
1099 FormsAccurately report 1099 information returns and ensure IRS filing with easeExplore all templatesW-9 W-8 FormsEasily manage and share taxpayer details to streamline payments and meet IRS requirements with confidenceExplore all templatesOther Tax FormsFillable tax forms simplify and speed up your tax filing process and aid with recordkeeping.Explore all templatesReal EstateReal estate templates for all cases, from sale to rentals, save you a lot of time and effort.Explore all templatesLogisticsSimplify your trucking and logistics paperwork with our ready-to-use transportation and freight templates.Explore all templatesMedicalMedical forms help you keep patient documentation organized and secure.Explore all templatesBill of SaleBill of Sale templates streamline the transfer of ownership with clarity and protection.Explore all templatesContractsVarious contract templates ensure efficient and clear legal transactions.Explore all templatesEducationEducational forms and templates enhance the learning experience and student management.Explore all templates
-
Features
FeaturesAI-Enhanced Document Solutions for Contractor-Client Success and IRS ComplianceExplore all featuresAI Summarizer Check out the featureAI PDF summarizer makes your document workflow even faster. Ask AI to summarize PDF, assist you with tax forms, complete assignments, and more using just one tool.Sign PDF Check out the featurePDFLiner gives the opportunity to sign documents online, save them, send at once by email or print. Register now, upload your document and e-sign it onlineFill Out PDF Check out the featurePDFLiner provides different tools for filling in PDF forms. All you need is to register, upload the necessary document and start filling it out.Draw on a PDF Check out the featureDraw lines, circles, and other drawings on PDF using tools of PDFLiner online. Streamline your document editing process, speeding up your productivity
- Solutions
- Features
- Blog
- Support
- Pricing


How to Make a PDF Editable to Share in Google Classroom
.png)
Julia Hlistova
Forbes once stated, 'It’s a fact that online learning is the future and will undoubtedly replace land-based learning.' Adapting to this shift is vital. Today's guide explores the art of making a PDF editable to share in Google Classroom. Learn how to reap all the perks of the power of technology to create engaging, interactive educational materials that seamlessly integrate with modern eLearning environments.
How to Make a PDF File Editable
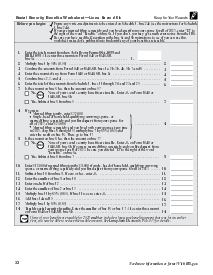
PDFLiner is a document management tool that can make any PDF document editable. In our step-by-step guide below, we'll take you through this process based on the example of the Chess Merit Badge Workbook from PDFLiner's library. This guide for teachers/merit badge counselors will help turn any PDF into a fillable and interactive document.
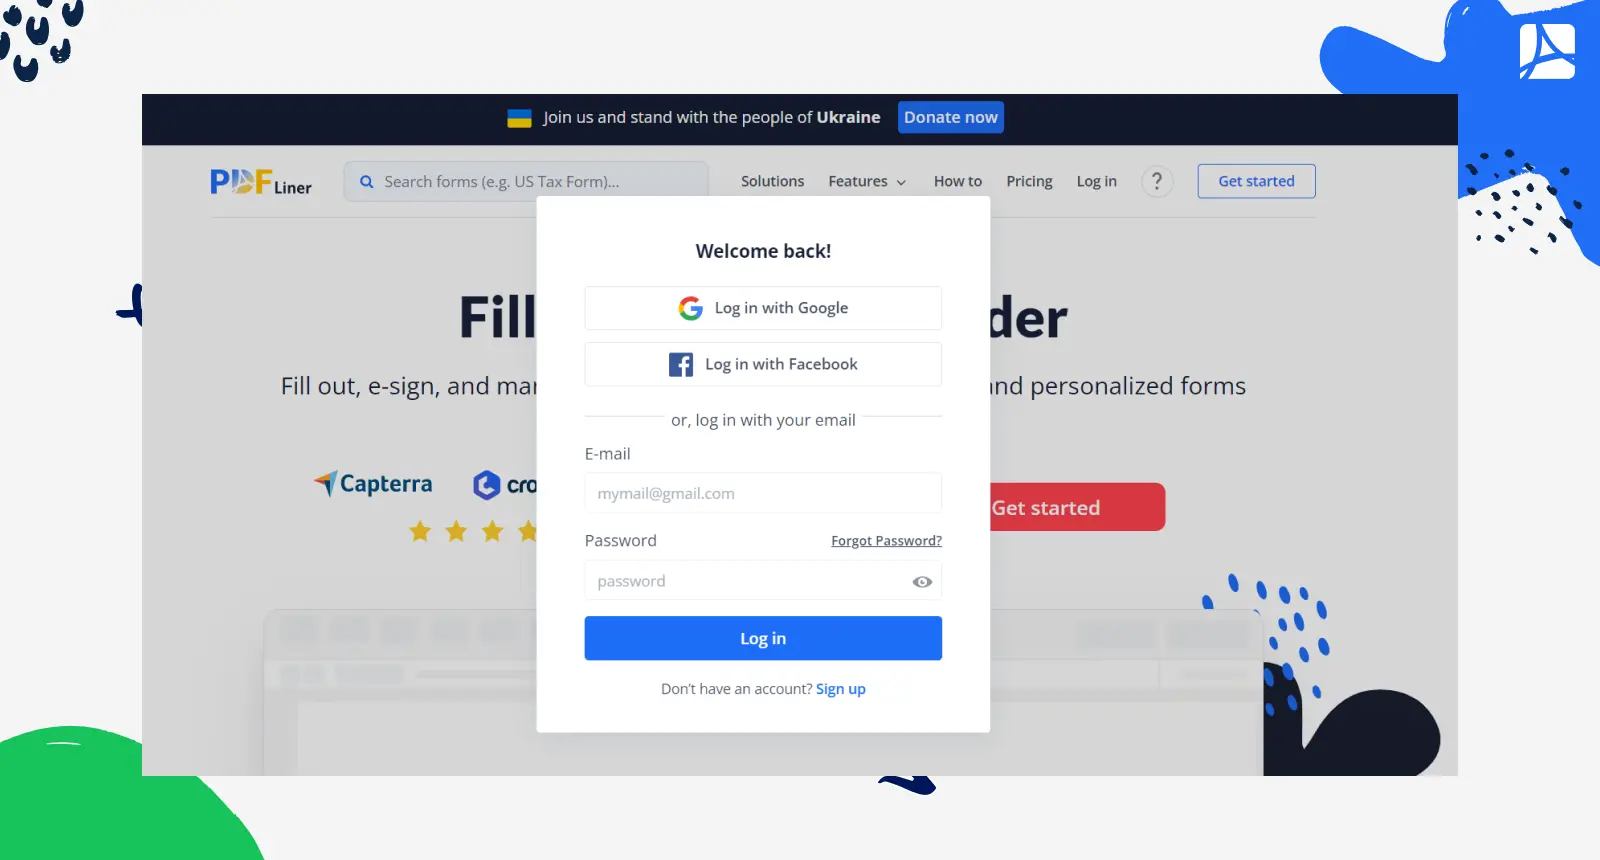
Step 1. Access PDFLiner. Begin by visiting the PDFLiner website and logging into your account. If you don't have an account, it's time to register.
Step 2. Find the Needed PDF in PDFLiner’s Library. If the PDF is not already in PDFLiner's library, you can upload it by selecting the 'Upload Document' tab and choosing your file. If it's available, find it in the library. Since the Chess Merit Workbook is available in PDFLiner's library, you’ll easily find it in the database.
.webp)
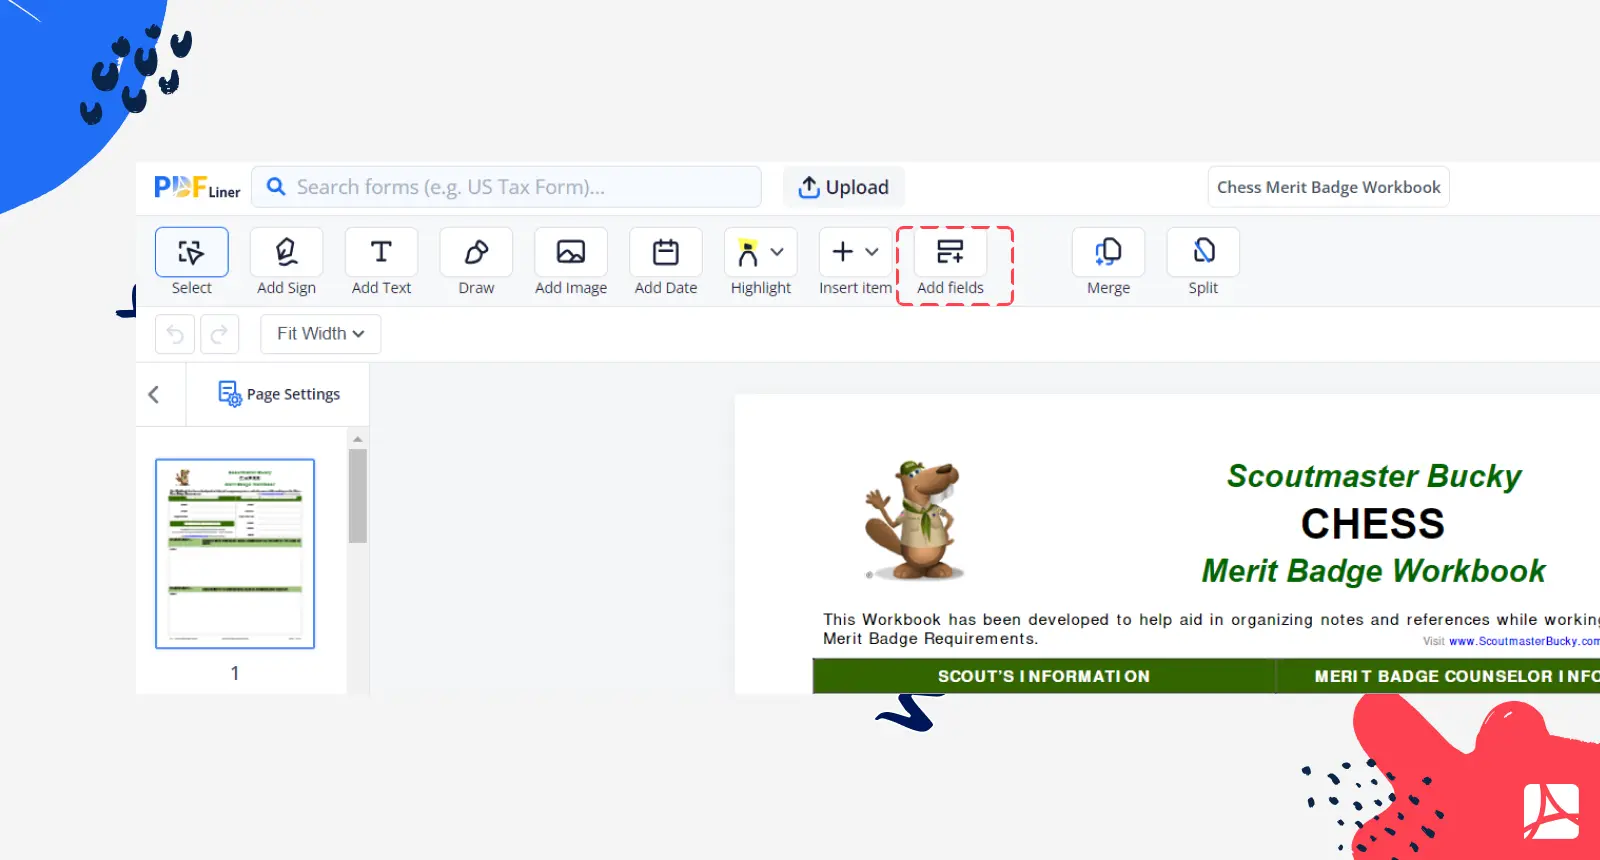
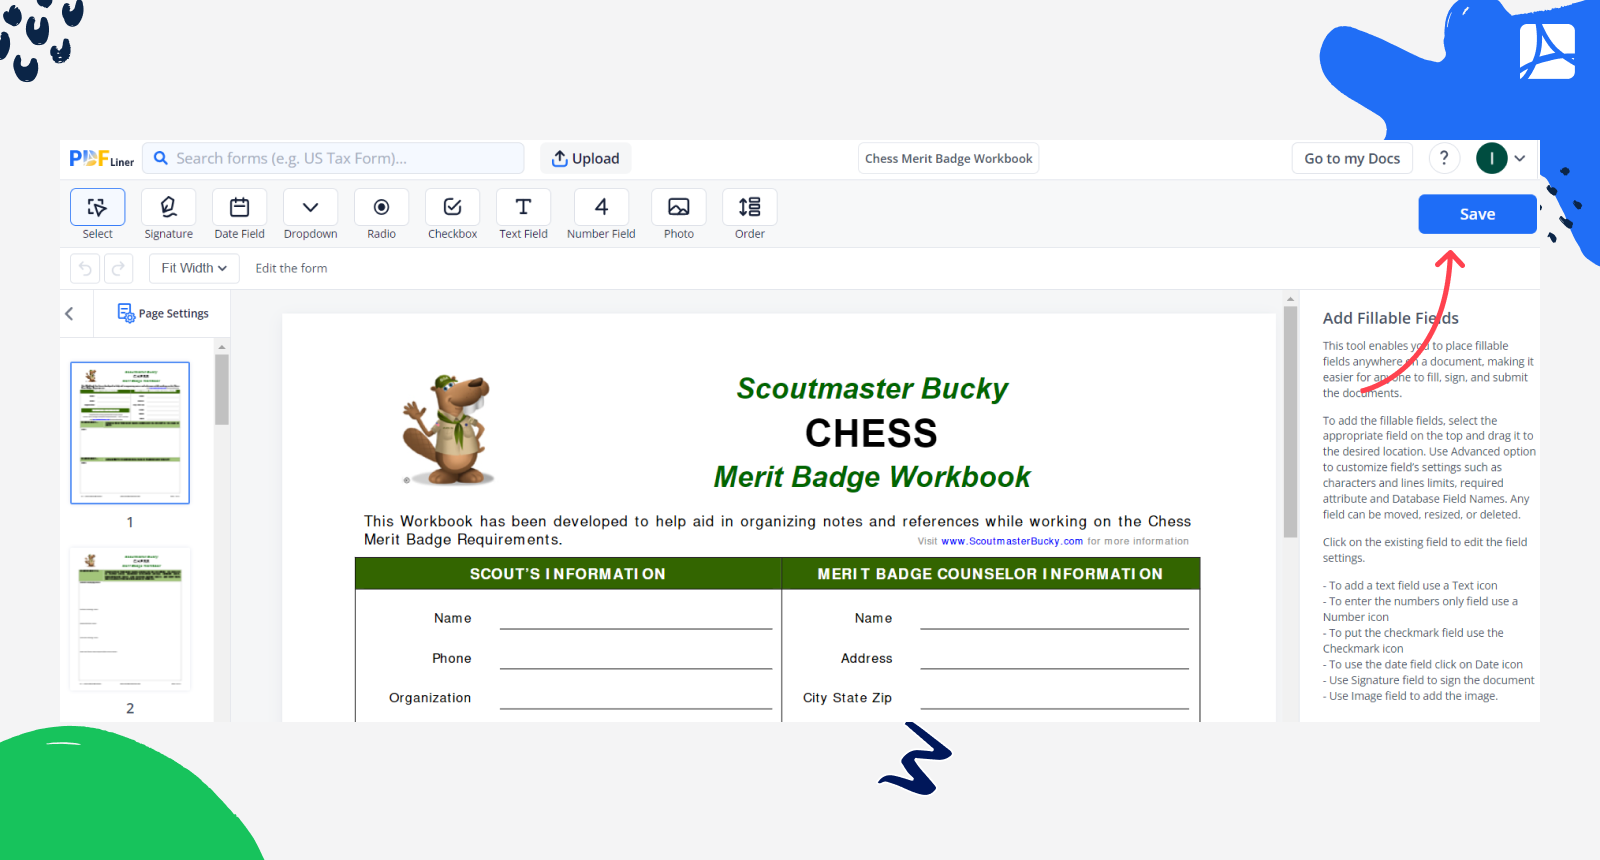
Step 3. Edit the PDF. If the PDF lacks fillable fields, you can easily add them by clicking the ‘Add fields’ button on the upper toolbar.
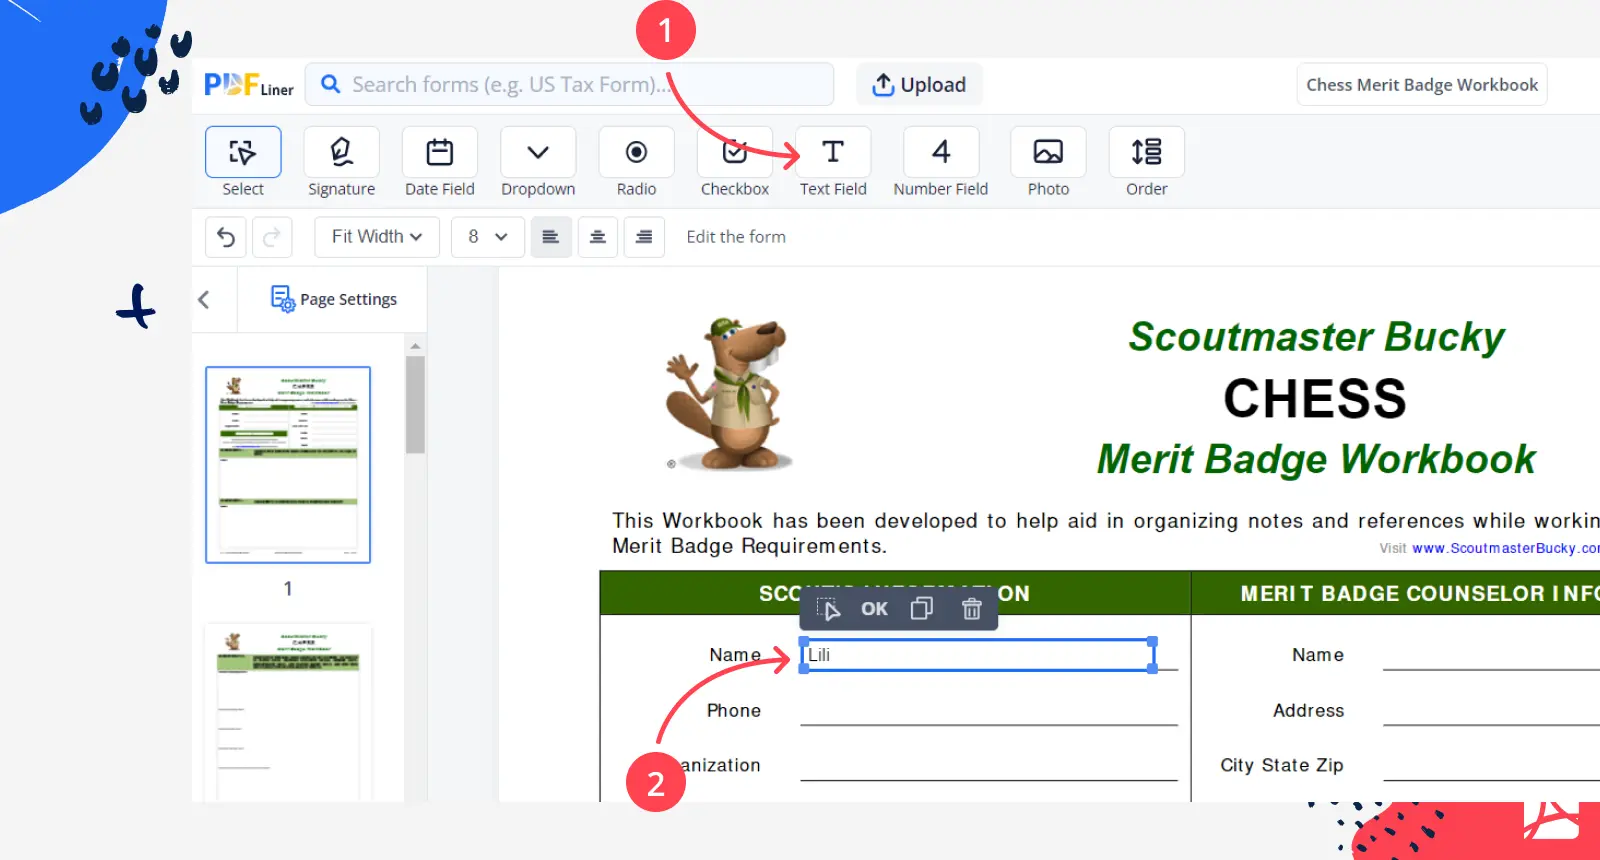
Step 4. Add Text Fields. Select the 'Text Field' option to insert a text field, place it where needed, adjust its size, and confirm your changes. You want students/scouts to type their names in the Workbook, so add a text field for 'Name.'
Step 5. Add Number Fields. For numerical entries, choose ‘Number Field’ on the dashboard. If necessary, divide it into cells and specify cell limits.

Step 6. Add Signature, Mark, and Date Fields. The same process applies to adding signature, mark, and date fields. Simply select the corresponding option on the dashboard. You want students/scouts to sign the Workbook, so add a signature field.

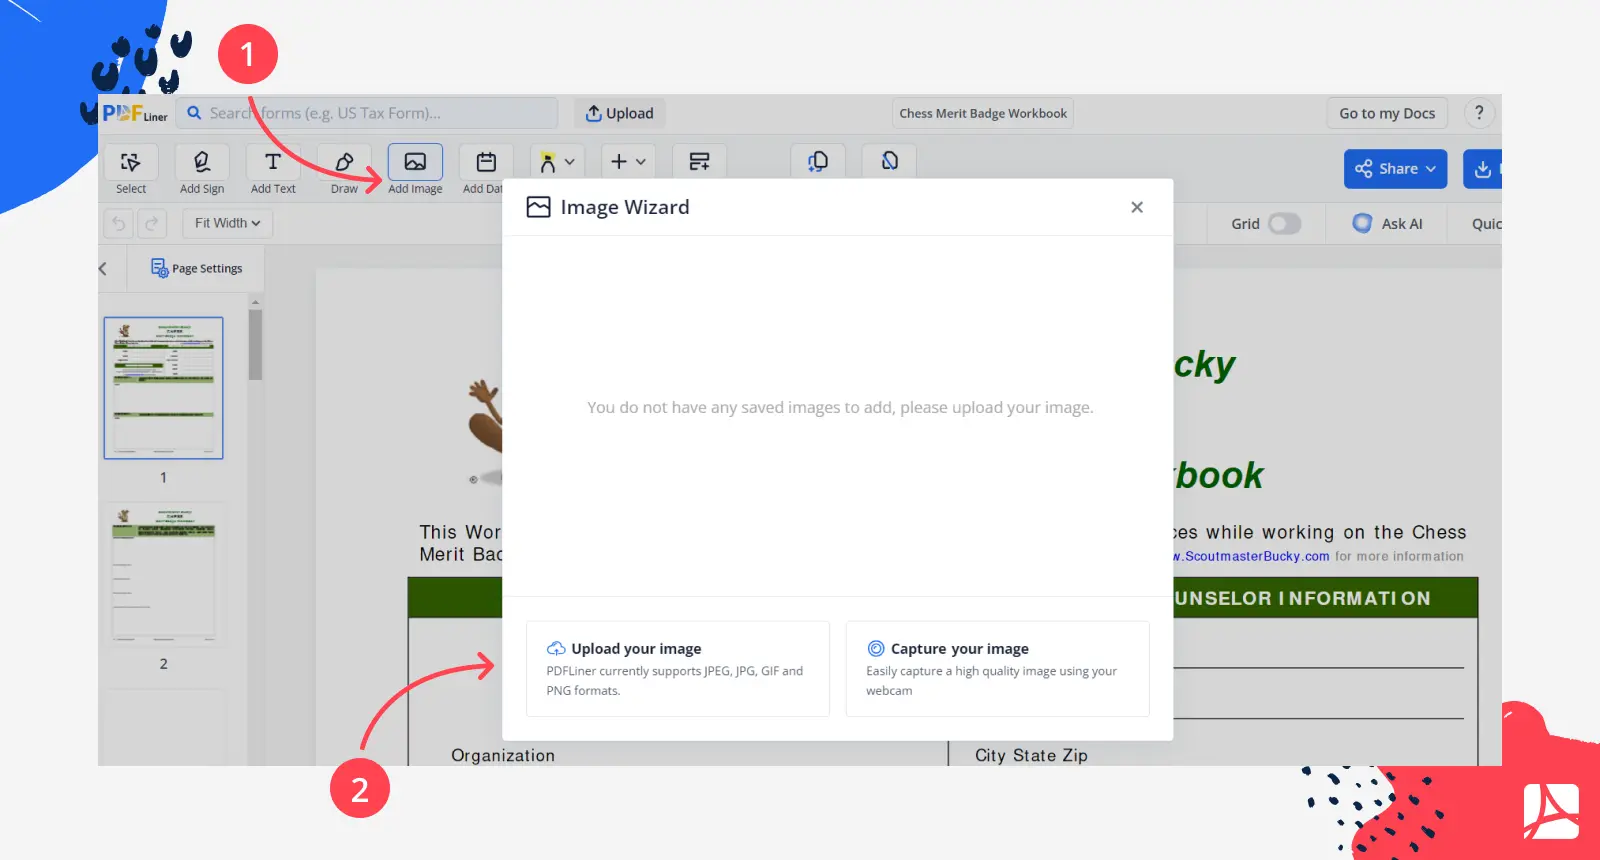
Step 7. Insert Images. To include images, click the image icon, select ‘Image,’ and place the image where it's needed in the PDF. You want to add diagrams to the assignment, so you insert image fields where students can upload their diagrams.
Step 8. Save and Share. After making all the necessary changes, click ‘Save.’ Your editable PDF is now ready for sharing with others. Your Workbook is now interactive and ready for distribution to your students.
PDFLiner effectively aids you in making a PDF editable. It, in turn, enhances all users' learning or work experience. Whether for educational assignments, forms, or professional documents, PDFLiner simplifies the process for everyone.
How to Share a PDF in Google Classroom
Now that you know how to make a PDF form fillable via PDFLiner, it’s time to learn how to share a PDF in Google Classroom. Follow these vital steps from our guide for teachers below:
Step 1. Create an Assignment
- Log in to your Google Classroom account.
- Click on the class to which you want to assign the PDF.
- Select the 'Classwork' tab.
- Click the ‘Create’ button and choose 'Assignment.'
Useful Tip. You can post the assignment to the entire class, a specific student or group, or multiple classes. Set a due date to keep everyone on track.
- Click on the ‘Add’ button to attach the PDF. You can attach a PDF from your Google Drive or upload one from your device.
- When attaching a PDF from Google Drive, you have several options:
- View Only. Students can read the PDF but cannot edit it.
- Edit. Students can collaboratively edit the same PDF.
- Make a Copy for Each Student. Each student gets an individual copy of the PDF, labeled with their name, for editing.
Step 2. Students Submit Their Assignment
- Students log in to Google Classroom, access the assignment, and click on the attached PDF.
- They can view the PDF, edit a shared document, or edit their own copy.
- Students can also attach documents, links, images, videos, or add-ons to their work.
- Once they have completed the assignment, they click ‘Turn In.’
Useful Tip. Before the due date, students can unsubmit their work, make changes, and resubmit it. After submitting a PDF from Google Docs, Sheets, or Slides, only the teacher can see and edit their work.
Step 3. Mark and Return Assignments
- As the teacher, you can access student submissions from the assignment.
- You can review their work, add comments, provide feedback, and assign a grade.
- To return the assignment, click ‘Return’ to send it back to the student with your feedback.
Step 4. Students Review and Edit
- Students can access their graded assignments and view their marks and feedback.
- If the assignment includes a Drive file, they regain edit access to the file for any necessary improvements.
In the words of Keith Phillips, Founder of realLINGUA, ‘If you’re successful in delivering eLearning, the learner won’t even be (nor should they feel the need to be) focused on the ‘e’ part, they’ll just be focused on how awesome the ‘Learning’ part is.’ And that’s exactly what our guides are aimed at — making you successful in eLearning. We hope you’re enjoying the process.
Google Classroom Sharing Alternative
PDFLiner is more than just a versatile PDF editing tool. It also offers an effective alternative for sharing interactive assignments and resources with your students. In addition to creating engaging home assignments, you can easily distribute them through public links or email. Our guide below is designed to help teachers make the most of PDFLiner's sharing features.
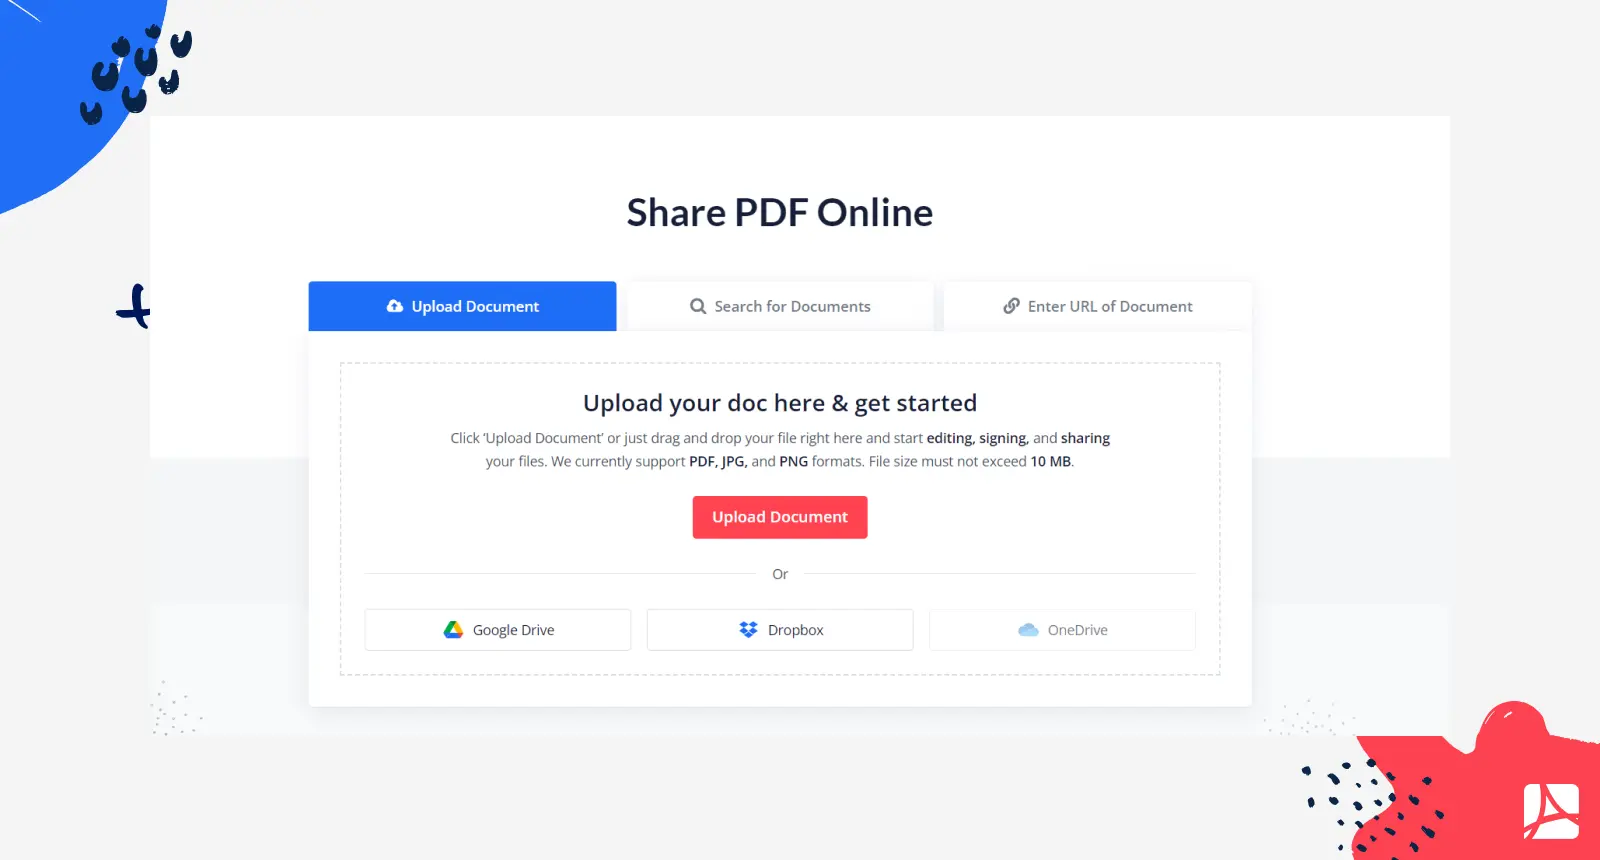
Step 1. Upload Your PDF Online. Start by uploading the PDF document you wish to share. You can upload a PDF from your computer or choose one from PDFLiner's extensive forms library.
Step 2. Fill Out and Edit. Once your document is uploaded, you can complete it or make any necessary edits. When you're done, click the ‘Done’ button in the platform's upper right corner.
Step 3. Start Sharing. Your file is now ready for sharing. In the menu, select the ‘Share’ function.
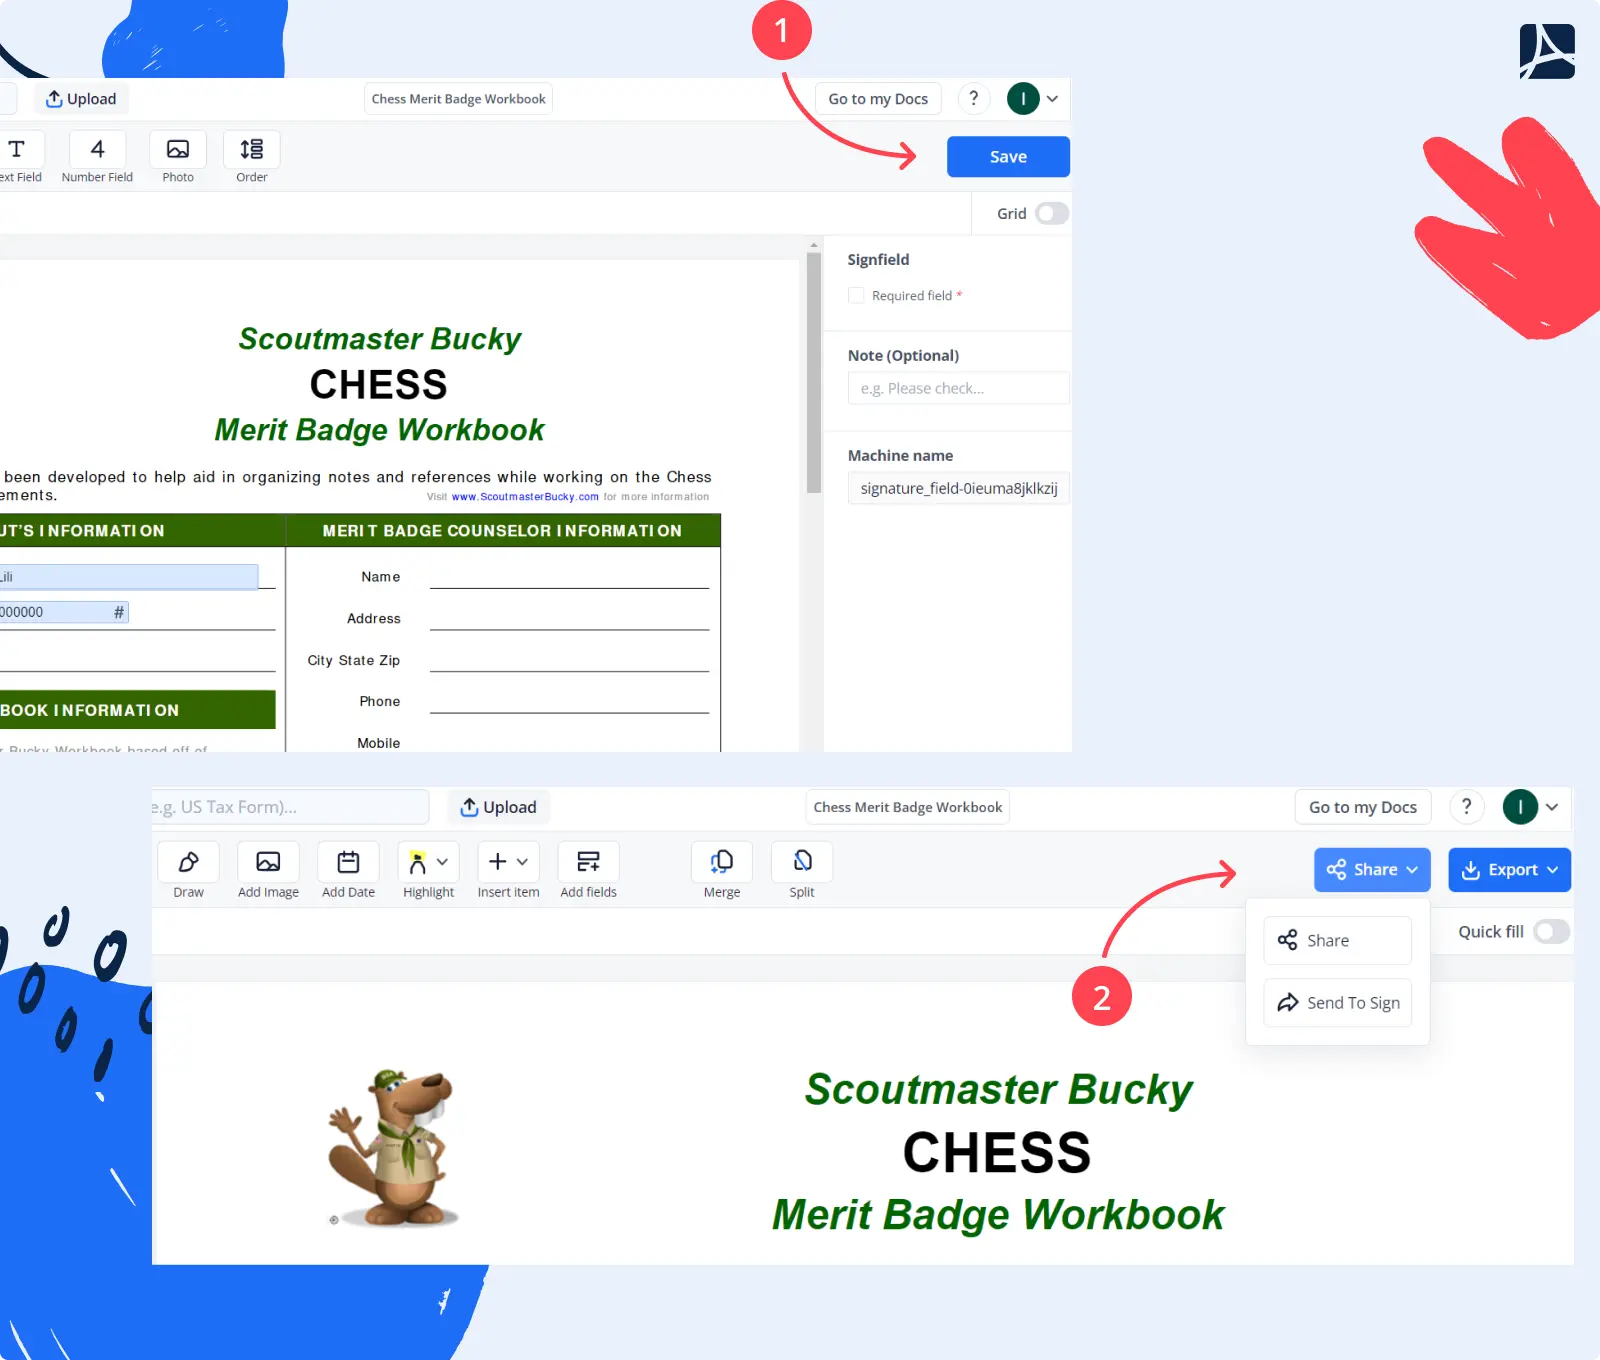
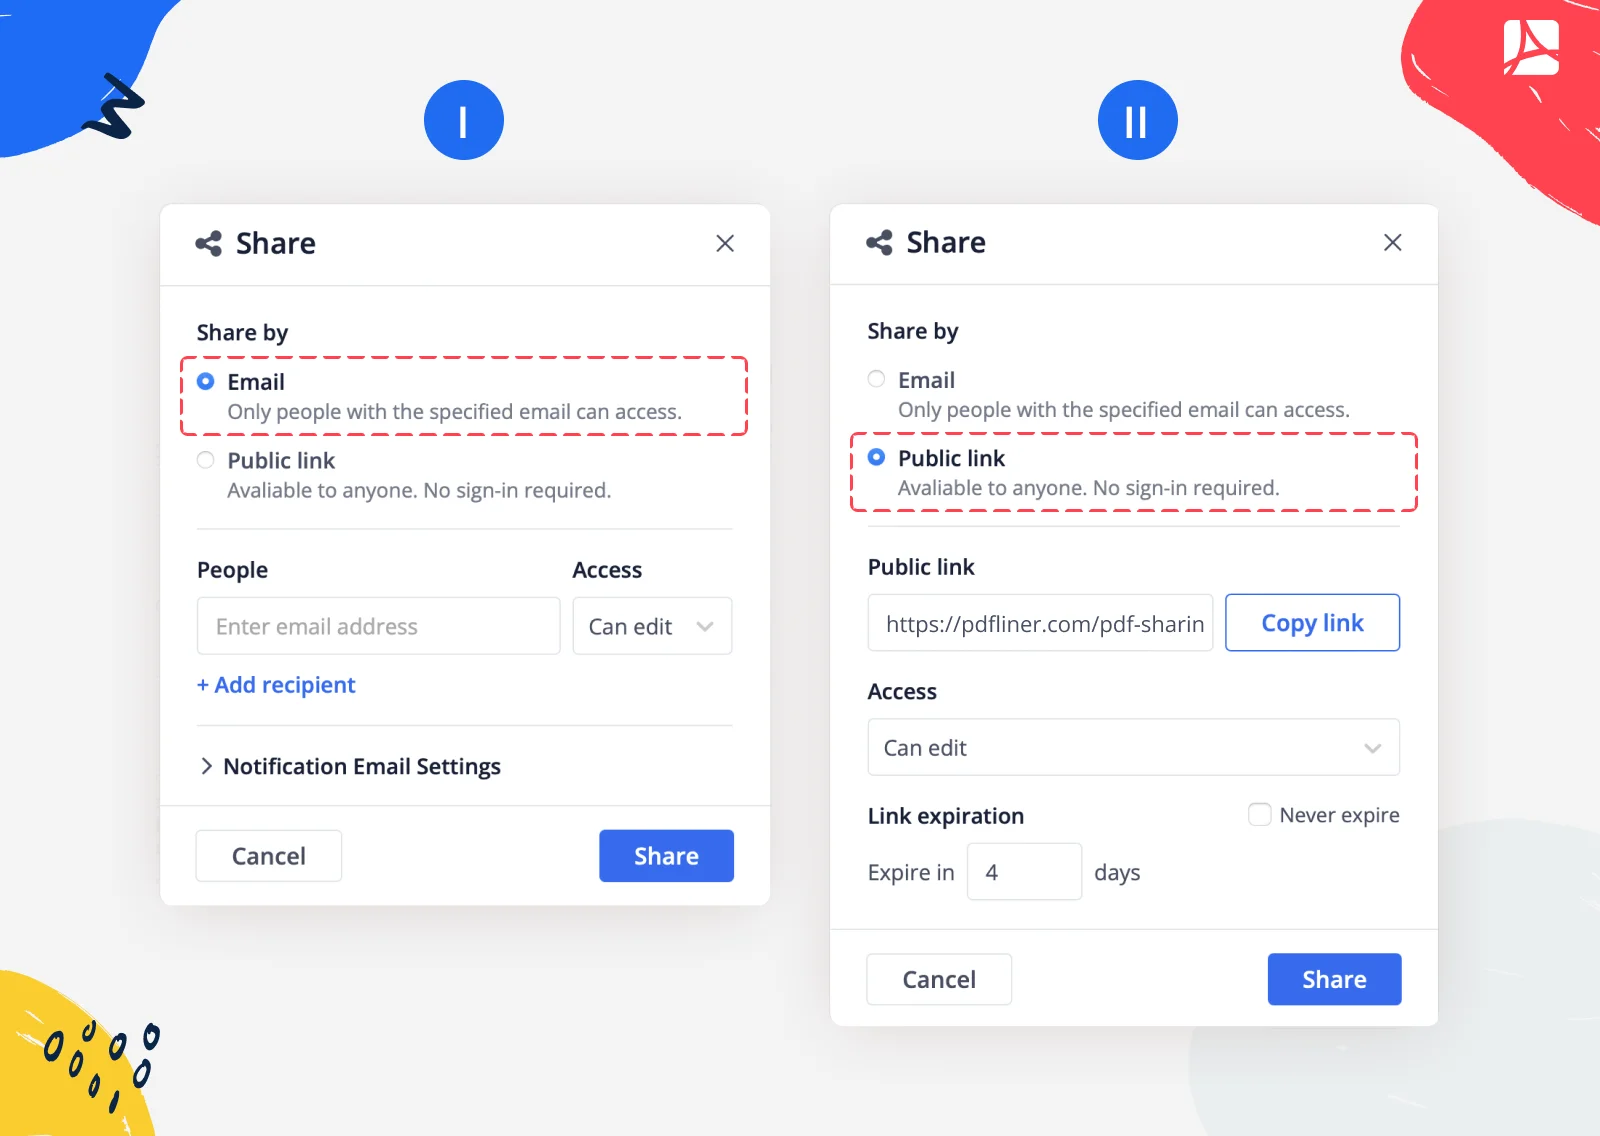
Step 4. Choose Your Preferred Sharing Method.
Share by Email:
- If you want to share the document with specific users while keeping it private for others, enter the recipients' email addresses.
- Specify the permission settings (view or edit).
- Customize the email subject and notification text under ‘Notification Email Settings.’
- Click the ‘Share’ button.
Each recipient will receive an email with a direct link to the shared document, allowing them to edit or view it based on your specified permissions.
Share with a Public Link:
- Choose the' Public Link' option to share the document with a broader audience.
- Set permission settings and a link expiration date.
- Copy the link and click ‘Share.’
Depending on their access rights, recipients can edit, e-sign, print, save, or send/submit the PDF. You will receive notifications regarding any document activity.
Step 5. Track Your Documents
Keep track of your shared documents and adjust sharing settings in your dashboard.
- In the 'Shared' tab, you can view and modify your shared documents, change permissions, and set link expiration dates.
- In the 'Shared with me' tab, you can access documents shared with you, along with the document owner's information and permissions.

Sharing PDF files with PDFLiner is a user-friendly and time-saving solution for educators. PDFLiner's sharing process simplifies document management and takes collaboration to the next level. We continually strive to improve our service and welcome your feedback on the sharing experience.
FAQ
What is the easiest program to make a fillable PDF?
PDFLiner is a user-friendly platform for creating fillable PDFs. Adobe Acrobat Pro is also widely used. But you will love how intuitively and speedily you’ll make fillable PDFs with PDFLiner. With the platform, you can easily create digital worksheets, add fields, and customize elements.
How do I make my handouts interactive?
Follow these tips from our experts. 1. Use hyperlinks to provide extra references. 2. Utilize QR codes for speedy access to online content. 3. Infuse your handouts with relevant vids and audio clips. It will effectively engage your students. 4. Last but not least, make the most of interactive questions/quizzes when preparing your handout. It will stimulate immediate feedback and help you evaluate the level of understanding of the material.
How do I turn a PDF into a worksheet?
To convert a PDF into a worksheet, open it in a PDF editing tool like PDFLiner. Add form fields for text, checkboxes, and fillable sections. Incorporate interactive elements like clickable links and multimedia. Save the modified PDF as a new worksheet ready for distribution and completion.
How do I turn a PDF into a worksheet?
Start with word processing or design software. Add interactive form fields for input, like text boxes and radio buttons. Incorporate multimedia elements (pics and vids). Work up clear instructions and intuitive navigation. Save the file in PDF format for easy sharing and completion by students.